LXD ist ein neuer Hypervisor zur Verwaltung von LXC Containern. Basierend auf den früheren LXC-Tools fügt LXD eine Abstraktionsschicht ein, mit der über mehrere LXD-Hosts hinweg Container verwaltet werden können.
Bei LXD handelt es sich um LXC 2.0:
$ lxc --version
2.0.11
$ lxd --version
2.0.11
Installation und Konfigurierung
Als Hostsystem verwende ich Ubuntu 16.04.
Die entsprechenden Pakete werden wie folgt installiert:
apt install lxd lxd-client
Als nächstes beginnen wir die Ersteinrichtung mit dem Befehl lxd init, hierbei werden wir aufgefordert verschiedene Fragen zu beantworten.
Die Einstellungen richten sich nach den persönliches Vorlieben, hier nur mal ein Beispiel:
$ lxd init
Do you want to configure a new storage pool (yes/no) [default=yes]? yes
Name of the storage backend to use (dir or zfs) [default=dir]: dir
Would you like LXD to be available over the network (yes/no) [default=no]? yes
Address to bind LXD to (not including port) [default=all]: all
Port to bind LXD to [default=8443]: 8443
Trust password for new clients:
Again:
Do you want to configure the LXD bridge (yes/no) [default=yes]? yes
Sofern man die Frage bzgl. der Konfiguration der LXC-Bridge mit yes beantwortet, sind die nächsten Fragen dazu auf einer ncurse-Oberfläche zu beantworten.
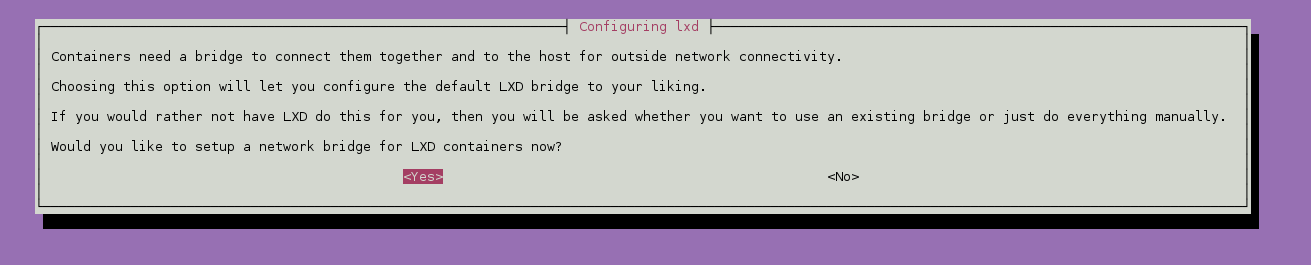
Wenn man mit der Konfiguration der LXD-Bridge fortfährt, werden noch die folgenden Konfigurationen abgefragt:
- Bridge Interface name (der Name sollte möglichst eindeutig sein)
- Soll ein IPv4 subnet eingerichtet werden?
- wenn ja, dann wird ein zufälliges subnet generiert, um Kollisionen zu vermeiden
- eine gültige IPv4-Adresse
- die Netmaske
- die erste zu (per DHCP) vergebene IP-Adresse
- die letzte zu (per DHCP) vergebene IP-Adresse
- die maximale Anzahl der DHCP-Clients
- ob der Traffic ins Internet geleitet werden darf
- Soll ein IPv6 subnet eingerichtet werden?
- wenn ja, dann wird ein zufälliges subnet generiert, um Kollisionen zu vermeiden
- eine gültige IPv6-Adresse
- die Netmaske
- ob der Traffic ins Internet geleitet werden darf
Wenn diese Fragen beantwortet sind, sollte eine entsprechende Meldung erscheinen:
Warning: Stopping lxd.service, but it can still be activated by:
  lxd.socket
LXD has been successfully configured.
Erstellen eines Containers
Um auch als unpreviligierter Benutzer Container verwalten zu können, muss der folgende Befehl für den entsprechenden Benutzernamen ausgeführt werden:
usermod -a -G lxd <user>
Um den aktuellen Status der erstellten Container anzuzeigen verwendet man lxc list
$ lxc list
+------+-------+------+------+------+-----------+
| NAME | STATE | IPV4 | IPV6 | TYPE | SNAPSHOTS |
+------+-------+------+------+------+-----------+
Die Syntax für die Erstellung eines Containers sieht wie folgt aus: lxc launch <repository:image/Version> <Name>
Wir beginnen mit einem Ubuntu 16.04-Container:
$ lxc launch ubuntu:16.04 ubuntu16
Creating ubuntu16
Starting ubuntu16
Dieser findet sich nun auch in der entsprechenden Liste:
$ lxc list
+----------+---------+---------------------+-----------------------------------------------+------------+-----------+
|   NAME   |  STATE  |        IPV4         |                     IPV6                      |    TYPE    | SNAPSHOTS |
+----------+---------+---------------------+-----------------------------------------------+------------+-----------+
| ubuntu16 | RUNNING | 10.94.203.89 (eth0) | fd74:150a:1e33:24cc:216:3eff:feef:8bb5 (eth0) | PERSISTENT | 0         |
+----------+---------+---------------------+-----------------------------------------------+------------+-----------+
Und erstellen wir noch einen Container mit Alpine-Linux:
$ lxc launch images:alpine/3.7 alpine
Creating alpine
Starting alpine
$ lxc list
+----------+---------+----------------------+-----------------------------------------------+------------+-----------+
| NAME | STATE | IPV4 | IPV6 | TYPE | SNAPSHOTS |
+----------+---------+----------------------+-----------------------------------------------+------------+-----------+
| alpine | RUNNING | 10.94.203.227 (eth0) | fd74:150a:1e33:24cc:216:3eff:fedd:cb2b (eth0) | PERSISTENT | 0 |
+----------+---------+----------------------+-----------------------------------------------+------------+-----------+
| ubuntu16 | RUNNING | 10.94.203.89 (eth0) | fd74:150a:1e33:24cc:216:3eff:feef:8bb5 (eth0) | PERSISTENT | 0 |
+----------+---------+----------------------+-----------------------------------------------+------------+-----------+Kurze Übersicht (lohnt sich bei größerer Anzahl von Containern):
$ lxc list --fast
+----------+---------+--------------+----------------------+----------+------------+
|   NAME   |  STATE  | ARCHITECTURE |      CREATED AT      | PROFILES |    TYPE    |
+----------+---------+--------------+----------------------+----------+------------+
| alpine   | RUNNING | x86_64       | 2018/04/07 17:24 UTC | default  | PERSISTENT |
+----------+---------+--------------+----------------------+----------+------------+
| ubuntu16 | RUNNING | x86_64       | 2018/04/07 17:22 UTC | default  | PERSISTENT |
+----------+---------+--------------+----------------------+----------+------------+
Einen Container steuern
Container starten: lxc start <Containername>
Container stoppen: lxc stop <Containername>
Container löschen: lxc delete <Containername>
Container clonen: lxc copy <Containername> <neuer_Containername>
Container umbennnen: lxc move <Containername> <neuer_Containername>
Container neustarten: lxc restart <Containername>, Neustart erzwingen: lxc restart <Containername> --force
Befehle im Container ausführen
Die Syntax um einen Befehl innerhalb eines Containers ausführen zu lassen lautet: lxc exec <containername> -- <Befel>
$ lxc exec alpine -- cat /etc/issue
Welcome to Alpine Linux 3.7
Kernel \r on an \m (\l)
um in den Container zu „springen“:
$ lxc exec ubuntu16 -- /bin/bash
root@ubuntu16:~#
Dateien in/aus einem Container kopieren
Eine Datei in einen Container kopieren: lxc file push <Datei> <Containername>/<Pfad>
Beispiel: $ lxc file push test.txt ubuntu16/tmp
Eine Datei aus einem Container kopieren: lxc file pull <Containername>/<Pfad> <Pfad>
Beispiel: $ lxc file pull ubuntu16/etc/hosts /root
Container-Images
Übersicht Image-Repos anzeigen
$ lxc remote list
+-----------------+------------------------------------------+---------------+--------+--------+
|      NAME       |                   URL                    |   PROTOCOL    | PUBLIC | STATIC |
+-----------------+------------------------------------------+---------------+--------+--------+
| images          | https://images.linuxcontainers.org       | simplestreams | YES    | NO     |
+-----------------+------------------------------------------+---------------+--------+--------+
| local (default) | unix://                                  | lxd           | NO     | YES    |
+-----------------+------------------------------------------+---------------+--------+--------+
| ubuntu          | https://cloud-images.ubuntu.com/releases | simplestreams | YES    | YES    |
+-----------------+------------------------------------------+---------------+--------+--------+
| ubuntu-daily    | https://cloud-images.ubuntu.com/daily    | simplestreams | YES    | YES    |
+-----------------+------------------------------------------+---------------+--------+--------+
Anzeigen der verfügbaren Remote-Images (am Beispiel von Ubuntu)
$ lxc image list ubuntu:
+--------------------+--------------+--------+-------------------------------------------------+---------+----------+-------------------------------+
|       ALIAS        | FINGERPRINT  | PUBLIC |                   DESCRIPTION                   |  ARCH   |   SIZE   |          UPLOAD DATE          |
+--------------------+--------------+--------+-------------------------------------------------+---------+----------+-------------------------------+
| a (5 more)         | 37bdd5d5f55e | yes    | ubuntu 17.10 amd64 (release) (20180404)         | x86_64  | 168.37MB | Apr 4, 2018 at 12:00am (UTC)  |
+--------------------+--------------+--------+-------------------------------------------------+---------+----------+-------------------------------+
| a/arm64 (2 more)   | 7cc678dae3a4 | yes    | ubuntu 17.10 arm64 (release) (20180404)         | aarch64 | 152.58MB | Apr 4, 2018 at 12:00am (UTC)  |
+--------------------+--------------+--------+-------------------------------------------------+---------+----------+-------------------------------+
| a/armhf (2 more)   | 72bc3e60a7f3 | yes    | ubuntu 17.10 armhf (release) (20180404)         | armv7l  | 151.80MB | Apr 4, 2018 at 12:00am (UTC)  |
+--------------------+--------------+--------+-------------------------------------------------+---------+----------+-------------------------------+
| a/i386 (2 more)    | 1e6733d5d460 | yes    | ubuntu 17.10 i386 (release) (20180404)          | i686    | 171.36MB | Apr 4, 2018 at 12:00am (UTC)  |
+--------------------+--------------+--------+-------------------------------------------------+---------+----------+-------------------------------+
| a/ppc64el (2 more) | c2534455905b | yes    | ubuntu 17.10 ppc64el (release) (20180404)       | ppc64le | 175.00MB | Apr 4, 2018 at 12:00am (UTC)  |
+--------------------+--------------+--------+-------------------------------------------------+---------+----------+-------------------------------+
| a/s390x (2 more)   | 6b9993fb98a0 | yes    | ubuntu 17.10 s390x (release) (20180404)         | s390x   | 160.01MB | Apr 4, 2018 at 12:00am (UTC)  |
+--------------------+--------------+--------+-------------------------------------------------+---------+----------+-------------------------------+
...
Snapshot
Snapshot erstellen
Da es sich um virtuelle Systeme handelt, hat man natürlich auch die Möglichkeit Snapshots zu erstellen:
$ lxc snapshot ubuntu16
$ lxc list
+----------+---------+----------------------+-----------------------------------------------+------------+-----------+
|   NAME   |  STATE  |         IPV4         |                     IPV6                      |    TYPE    | SNAPSHOTS |
+----------+---------+----------------------+-----------------------------------------------+------------+-----------+
| alpine   | RUNNING | 10.94.203.227 (eth0) | fd74:150a:1e33:24cc:216:3eff:fedd:cb2b (eth0) | PERSISTENT | 0         |
+----------+---------+----------------------+-----------------------------------------------+------------+-----------+
| ubuntu16 | RUNNING | 10.94.203.89 (eth0)  | fd74:150a:1e33:24cc:216:3eff:feef:8bb5 (eth0) | PERSISTENT | 1         |
+----------+---------+----------------------+-----------------------------------------------+------------+-----------+
Um zu schauen wie die Namen der Snapshots lauten: lxc info <Containername>
$ lxc info ubuntu16
Name: ubuntu16
Remote: unix://
Architecture: x86_64
Created: 2018/04/07 17:22 UTC
Status: Running
...
    lo:
      Bytes received: 0B
      Bytes sent: 0B
      Packets received: 0
      Packets sent: 0
Snapshots:
  snap0 (taken at 2018/04/07 17:47 UTC) (stateless)
  snap1 (taken at 2018/04/07 17:53 UTC) (stateless)
Einen Snapshot restoren
Allgemeine Syntax: lxc restore <Containername> <Snapshotname>
Beispiel: $ lxc restore ubuntu16 snap0
Einen Snapshot löschen
$ lxc delete ubuntu16/snap0
$ lxc info ubuntu16
Name: ubuntu16
Remote: unix://
Architecture: x86_64
Created: 2018/04/07 17:22 UTC
Status: Running
Type: persistent
...
Snapshots:
  snap1 (taken at 2018/04/07 17:53 UTC) (stateless)
Profile
Anzeigen der aktuell verfügbaren Konfigurations-Profile
$ lxc profile list
default
docker
Einzelheiten eines Profils anzeigen
$ lxc profile show default
config: {}
description: Default LXD profile
devices:
  eth0:
    name: eth0
    nictype: bridged
    parent: lxdbr0
    type: nic
name: default
used_by: []
Profil bearbeiten
$ lxc profile edit default
Profile einem Container zuweisen
lxc profile apply <Containername> <profil1>,<profil2>,<profil3>,...